Showing posts with label Pollinators. Show all posts

Friday, 31 July 2015

Listening to your landscape

To have a more sustainable landscape, you need to listen...

As a long-time gardener with a masters degree in botany, I was certain that I could garden in north Florida when my husband and I moved here in 2004. I've told this story before, but I was shocked and surprised at how wrong I was. Some Florida gardening truths were quickly discovered like how tulips don't grow well here, not even as annuals, because our winters include warm spells so the soil doesn't stay cold enough. Other revelations have taken more time...

Tropical sage in the herb garden by the kitchen window.

Listen to the birds & bees

Tropical sage (Salvia coccinea) has monopolized much of my herb garden. I transplant some of it from this location when I plant basil, dill, or one of the other annual herbs, but mostly I leave this native volunteer in place because it attracts hummingbirds, butterflies, several types of bees.

I started the herb garden years ago by ripping out the tea roses and various non-native shrubs that were not doing well in this WSW-facing wall. At first everything was in its assigned place, but when the sage arrived, everything changed. I listened to the birds and the bees who needed this beautiful native more than I needed a neat garden.
This female hummingbird has been resting on a bare branch of coral honeysuckle to entertain my husband and me while we eat our lunch. Not really, but this perch is just above one of her favorite spots, my herb garden, which is filled with tropical sage.Carpenter bees are too big to enter the narrow sage flowers, so they bite holes in the tops of the flowers to "rob" the nectar without doing the work of pollinating.
Sine this L-shaped garden was not under general irrigation,
 I turned it into a container garden.

Container conversion project

An early project in our landscape was my conversion of a "messy bed" filled with Mexican petunias, low growing gardenias, weeds, and other volunteers. I wrote about this project as one of my Adventures of a Transplanted Gardener articles, which are now hosted over on Floridata.com, Troublesome spot? Convert to containers.

Well, it's taken a while, but the other day I switched back to what will probably be a somewhat messy bed, but this time it will be filled with native wildflowers and I shall call it a "cottage garden." 

After removing the pots, I was left with weeds and wildflowers.
The other day I removed the pots, which were not all that attractive anymore, carefully lifted the tropical sage plants, scraped out the chipped wood mulch and the nice compost below it, and then ripped out the old weed barrier cloth, which had not been very effective in keeping out the weeds.

I put the saved chips and mulch back in the bed, planted the sage in three groupings, transplanted some other out-of-place wildflowers from other parts of the yard, and then sowed some Florida wildflower seeds in the empty spaces.  The tropical sage and the other plants survived the transplant, but I'll write more about this project as it matures. So far I'm happy with the result and I think, in the end, it will be easier to handle than the containers.

Florida wildflower seeds have been sown and the wildflowers are now replanted in groupings. It's a garden designed by listening to what it said rather than overpowering it with my will.

The edge of the lawn needed some updates.A close-up of the invading ferns...
A look down this edge now.

The ferns are invading!

Every couple of years I work on the lawn edges. Many times the landscape indicates what it would prefer. I've been writing about edges for some time; see my piece "Cutting edges," for earlier lawn removals. You can also listen to my podcast on the topic: Cutting Edges 1/17/08.

This time around, the ferns, mostly netted chain ferns (Woodwardia areolata) have crept into the grass, which is sparse in this mostly shady edge. So I pulled the grass by hand in a way that was least disruptive to the soil, moss and the ferns. Later I'll come in with some pine needles or wood chips. If it were closer to fall, I'd wait for the leaves, but I don't want to wait that long.

We still want a mowed area down to the lake, but maybe my husband will have one less trip to make. All because I listened to the ferns.
The point-of-view of this photo starts at the cart in the above photo.
The line drawn indicates the proposed new edge of the lawn.
More ferns are invading the grass down here, too.

Other listenings...

Sadly, these suckers will never grow into trees because of the red bay ambrosia beetle and its nasty fungal disease. My husband thought we should trim them back  since they are so ratty looking. I pointed out that the spice bush swallowtail and other related butterflies rely on trees in this family for their larval food. So all those holes in the leaves means that they have found them. Yay!
The Elliot's love grasses make a nice border, but...
I wrote about this new wildflower extension of our front meadow in Adventures in creating a native garden. I emphasized how important a civilized edge is to make a native garden or meadow look like a planned space. I used three bunches of Elliot's love grass (Eragrostis elliottii) to do that job. They looked good for 2 years and then failed to come up the next year. I talked to the grower and wholesale supplier for these plants to ask him what to do. His answer was the classic "listen to your landscape" advice, "Don't plant it there again. Find something else." How logical.

I hope you can hear your landscape when it speaks to you.


Green Gardening Matters,
Ginny Stibolt

Wednesday, 8 July 2015

Integrated pest management in the edible garden

Squash borers: Take action before they do damage.


I ended up with some volunteer butternut squash vines from kitchen scraps buried in the garden. Normally, I would not be growing them during mid-summer, but we'll see how they do in our hot summer weather.

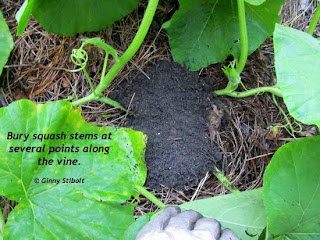
One action item is to bury the base of the stems and then again along the vine in several places. Then even if the borer moth finds a place to lay her eggs and her larval offspring hollow out the stem, the whole plant will not have to depend upon that one section of stem for water and nutrients. It will have alternative roots. You really really don't want to use any poisons around squashes because each female flower needs to be visited by 7 or more pollinators to ensure fruit production.

Bury the base of the squash stems with compost and mulch with pine needles to keep squash borer moths away.Then bury the vine at several additional places along its length.

There were some big holes in my okra leaves.

A brown stinkbug. 

Okra pest

My husband and I love our fresh okra. Normally, there are a few holes, but the okra plants are so vigorous that we have not had to take any action. This year is different, because something was eating some good-sized holes in the leaves. The okra seems unfazed by the damage, but I decided to look for the culprit.

I turned over a well-chewed leaf and found a brown stinkbug. They fly, but they are not very fast, so they were easy to pick it off, throw to the sidewalk, and then step on them. Pee-yew... they really do stink. I found a few more (just one to a leaf) on this day and then again on the next, and the next. Now, I'm not finding any, but I'll keep looking.

We've had so much rain recently (8" in June) that it's not been necessary to do much extra irrigation, so my work to build swales between the okra was probably not necessaryat least not so far. You can read my article Okra Swales for more information on how and why I use this method. 


Some clearing out of the jungle

It's been several years since the wild area out in the front meadow has seen any attention. Normally that's fine with us, but for the last few days, my husband and I have been doing some moderate clearing. We work only in the early morning from about 6:30am to 9am. It's the catbriar (Smilax spp.) that gives us fits. To reduce future maintenance, it's important to dig up the tubers rather that just cut off the vines because those tubers provide the energy for more and bigger shoots. One of these days I'm going to clean up their tubers and make a batch of sarsaparilla. These tubers do have a slight peppery taste. There are 2 recipes in Peggy Lance's new book: Florida's Edible Wild Plants. We've been eating the soft young tips in salads for years, but the drink would be a new experience.

Our Backyard Habitat sign was dislodged from its tree as we pulled the vines from the trunk, so I scrubbed it off and rehung it. It's been nearly ten years since we've been certified. Read my post done at that time: Creating Backyard Habitat.

I was cleaning out some catbriar vines
and made sure to dig up the tubers.
I cleaned off my backyard habitat sign and rehung it
at the front corner of the lot so my neighbors can see it. 

Good night moonflower!

A sunrise on the banks 
of the St. Johns River


Good Night Moonflower

Good night moonflower.
As the sun is rising, 
And others wait to start their day,
You fold up your brilliant white petals,
That glow in the dark,
to attract your night-flying pollinators.
Daytime's here. Your work is done!

The saltmarsh mallows (Kosteletzkya pentacarpos) glow in the sunrise.
I hope you are having good summertime adventures in your yard and gardens.

Green Gardening Matters,
Ginny Stibolt

Monday, 24 November 2014

Yard critters

A green treefrog (Hyla cinerea) jumped out of the beggar ticks (Bidens alba) that I had pulled from the front garden.
A bagworm (Oiketicus abbotii) is overwintering on a beautyberry bush.

Managing exuberance carefully

I allow some beggar ticks (Bidens alba) and snow squarestem (Melanthera nivea) to grow in restricted areas to attract all those pollinators. But in the fall, I harvest those that have escaped to other places in the landscape to reduce the population and weeding the next year, at least to some degree. So last week I started pulling and a cute green treefrog that was using these stems for shelter jumped out of the cart. And the frog is just the wildlife that is evident. There could be hundreds of bugs snuggled inside these stems for the winter. Instead of leaving these stalks out with the yard waste, I add them to various brush piles, so those insects will have a chance to make it through the winter. The songbirds also use the brush piles for shelter, so they may appreciate the seeds, and maybe even some of those hidden bugs. 

Nearby, I spotted this bagworm (probably Oiketicus abbotii) hanging from a beautyberry branch. This moth is different than most, in that it gathers plant parts to stick to itself as a caterpillar to build protection. When its ready to pupate, it glues its portable shelter to a secure location and seals itself inside. When the female reaches the adult phase, she will be flightless and will emit pheromones to attract males. When a male arrives, they mate inside her sack where she lays her eggs and dies. The new larvae feed on her remains and other food that she's stored there. When ready, the new larvae head out on their own, often on a long strings of silk that balloon in the wind so the larvae swing away from each other. Isn't Mother Nature amazing?


Fall goldenrods! 


I planted seaside goldenrod (Solidago sempervirens)  this spring thinking it would be similar to the sweet goldenrod  (S. ordora), which volunteers in my yard, but no. It bloomed later in the season and it attracted a different set of bees. Normally I see carpenter bees with their shiny abdomens, but these are real bumble bees (probably Bombus impatiens).
An insect wove an overwintering shelter within the flattop goldenrod (Euthamia caroliniana) inflorescence, so I'll leave this stalk standing, and if I'm lucky, I'll find out what's inside this cocoon.

The spiny orbweaver!

Spiny orbweaver (Gasteracatha cancriformis): I found this beautiful spider doing her work in a gap on the far side of our driveway. 
We loved seeing this beautiful little spider and the hand lens came in handy to see her up close. It's been a couple of weeks since I took these photos, but she occupies this same gap in the trees in our mostly wild area on the far side of the driveway. We've had some high wind events and a frost, but she's still out there. She has had to reweave her orb at least 4 or 5 times since we've been aware of her, but she may have been there for months before that.

The markings on her back look sorta like a smiley face and those 6 red spines look fierce. Isn't this a cool find? Of course, the reason we have all of the critters is that we have used no landscape-wide pesticides since 2004. If you'd like to improve habitat for birds in your yard, you must invite the bugs. It's time to break that poison cycle. Read my post: A poison is a poison is a poison for details on the whys and hows.

I called my husband out to see her. She's small, so this hand lens is useful.Suspended above my garden glove, you can see how small she is.

The sun makes the seeds of this bluestem grass (Andropogon sp.)
shimmer. How beautiful.

The Disney Wildlife Preserve

Last Saturday I headed down to Kissimmee to the Nature Conservancy's Disney Wildlife Preserve for a Florida Native Plant Society board meeting. It was great to see old friends and meet new ones. The morning presentation was really interesting, the pot luck lunch was an eclectic collection of yummy stuff, and then in the afternoon I met with Marjorie Shropshire to talk through the plans for the next book. Marjorie illustrated both "Organic Methods for Vegetable Gardening in Florida" and "The Art of Maintaining a Florida Native Landscape," which will be released in August 2015. Now we are working on the proposal for book #4. Stay tuned for more details.

Our discussion was delayed while we took photos of this wonderful Florida praying mantid. It was near my shoulder, so I felt like Jiminy Cricket was there to give me advice. "Don't poison your landscape," she whispered in my ear.
A Florida praying mantid (Stagmomantis floridensis) behind my shoulder at the Disney Wildlife Preserve.
Marjorie took this photo because I did not want to disturb this magnificent insect.

Seasonal colors

Here in north Florida, we don't get the rich fall colors that you see farther north, but the Virginia creeper (Pathenocissus quinquefolia) lights up the landscape. And its blue berries feed the winter birds.
Even in Florida, there is some color as we move into winter. Virginia creeper provides reliable color and the way it is festooned across the vegetation, it make everything look festive. And speaking of that, I wish you and yours a bountiful Thanksgiving. I hope you'll be able to provide at least some of your family's meal from your edible garden.

Green gardening matters,
Ginny Stibolt

Saturday, 30 August 2014

Garlic chives, a bountiful evergreen crop

The evergreen garlic chives supplies plenty of fresh greens all year. At the top of the photo on the left, you can see how big the spaghetti squash plants are that I talked about last time and the okra just is going nuts. We are harvesting several each day, which is a good thing...
Harvest with a sharp knife or scissors with a cut near the soil level.

Garlic chives!

A few years back when researching crops for Organic Methods for Vegetable Gardening in Florida, I bought some garlic chives seeds (Allium tuberosum) and planted them next to my meadow garlic bed. (2 perennial crops together makes sense when everything else in my edible beds is changed up several times a year.) At first I was disappointed that only 3 or 4 seeds sprouted, but now I don't know what I'd do with any more. It's been amazing. We can use it all year long.

We use it in soups, salads, stir fries, dips, pestos, and more.  The other day I needed a pesto, but most of my lime basil* had been harvested, so I made up the difference with 7 or 8 bunches of garlic chives. It turned out very well. My recipe for pesto is in the Organic Methods book, it is more of a pesto sauce that's ready to use than the standard pestos. (*The lime basil seems to last better in our summers than the standard sweet basil and its citrusy flavor works well for our recipes.)

While the common name, garlic chives, is descriptive of the onion/garlic taste, this is on the garlic side of the genus with its flat leaves. Chives is on the onion side and its leaves are hollow. I grow chives as well and we love the subtle flavor, but chives does not take to cooking at all. It's always good to have some choices.

I cut off whole sections to use. There's plenty for us throughout the year.

I planted some of my cool-weather crops the other day after several mornings with temperatures well below 70 degrees. It's probably a little early, but I'm anxious to see how these rainbow carrots do. Very cute packaging, but will the carrots live up to their wrapper?

Predators in the yard!

So I was out back working to clear some encroaching vegetation from the path and caught a movement out of the corner of my eye into this mound of sand at the edge of the lawn area. Of course I had my camera in my pocket, so I hunkered down with my camera ready to shoot whatever emerged from the hole. It was not surprising that it was a huge cicada killer when you look at the size of her sand mound.

There were several nests lined up along the edge of the lawn out back. To host these beneficial insects in your landscape, use no landscape-wide insecticide of any kind and leave some of your property unplanted and unmulched. For more information on cicada killers see this post from IFAS

A cicada killer female emerges from her expansive underground nest.
The volume of soil removed for the nest is amazing. See the runway across the top of the mound just above the tips of my fingers. Nests can be up to 4' long with 16 cells—one for each egg/larva.
And while we are talking about wasps...
Paper wasps are also effective predators in the landscape, but their nests are well above the ground. This nest hangs on a dog fennel stem in a vacant lot across the street.

As seen in Clay Today...

My fungus article for Clay Today's Oakleaf Magazine is on page 23.

Sunrise at Jacksonville Beach the other day. I loved the reddish sunlight on the sea oats.

A Florida moon shot...2 flyers. As I was snapping a shot of this heron, a mullet jumped just at the right time. :-)

I hope you're ready for your cool weather crops and I strongly urge you to try some garlic chives so you can always have something fresh from the garden for your salads, pestos, and stir fries.

Happy Labor Day and I hope that any labor your are doing for the holiday is in the garden.

Green Gardening Matters,
Ginny Stibolt

Monday, 28 July 2014

6 reasons to use pine needle mulch in edible gardens

I use pine needles in between my wide rows in the edible gardens.
Here are some of the reasons for using pines needles in wide-row edible gardens. (Read my post "Wide row planting & trench composting" for the details on this planting method.)

Pine needle mulch:
1) does a good job at limiting weeds.
2) doesn't form a crust, so even a light rain filters to the soil and doesn't roll away.
3) is easy to handle and remove when it's time for a crop change.
4) lasts for 2 or more years.
5) does not significantly acidify the soil below.
6) is free if there are pine trees in your neighborhood.

Corn salad, red-stemmed spinach, and garlic growing in wide rows in a winter bed. The pine needle mulch is 4 or 5 inches thick in the trenches between the rows. For crops like onions or garlic I mulch the whole row with about an inch of pine needles—the crop will grow right through it.
Use a very light layer of pine needles over the area where you've planted seeds. Here  I removed the smaller okra seedling and left just one to grow in this space around my okra swales, because you don't want to crowd okra. I always plant 2 or 3 seeds in each spot to make sure I get at least 1 good plant, especially when the seeds are older.
When ready to plant, use a leaf rake to clear the pine needles away. For this garlic, I'm ready to create the wide rows and to dump my kitchen scraps in the bottom of the trench between the rows. Note the wood chips on the path next to the garden.

This batch of needles contained a fair amount of soil after I removed it from the bed, so I raked the whole wad of needles across the lawn to clean them up. As a bonus, the freedom lawn receives an addition of compost.
I collect pine needles from the neighborhood
streets--after a storm is especially fruitful.
Then I keep a pile of them near my gardens.
Down by the lake, a longleaf pine drops its foot-long needles. Easy to rake and great for mulch. My husband mows every other week, so before he mows, I often head down there to collect a new batch.

Why not wood chips?

I've written before about using arborists' woodchips in the landscape, but I don't use them in my edible gardens for two reasons.

Wood chip mulch:
1) is impossible to remove completely once it's laid down. For other uses, like paths and more stable gardens, that's not a problem, but it doesn't work well with all the activity of changing crops at the end of the season.
2) depletes nutrients as it comes in contact with the soil microbes. Again for path mulches, this is an advantage for keeping down weeds, but we work so hard to increase the nutrient level in our edible gardens, why compromise it in any way? Eventually, the chips decompose and add nutrients and humus to the soil, but not at first.

Getting ready for fall...


Yes, it will be 6 weeks or more until I'm ready to start planting the cool weather crops, but there will be some end of summer crops like squashes, cucumbers, sugar snap peas and maybe tomatoes. It was time to turn under my marigold cover crops into their beds, so they'll be ready for the next set of crops. Read about my multi-year marigold experiment: Results: the nematode experiment. 

These two vegetable beds (with their marigold cover crop) are ready to be turned.

There is a Chinese fringe bush at the north end of this bed. Each year I remove its roots that are encroaching into the garden space.
I lay in unfinished compost on top of the marigolds and then
I'll add back the original soil.

First I pull the marigolds and weeds, and then I rake away the pine needles with a leaf rake. I raked the pine needles from this bed across the lawn as shown in a photo above to get rid of the embedded soil. Then I dug out about 5 or 6 inches of soil from the whole bed into the big cart. This bed is about 6.5 ' by 5' and I filled the whole cart. I laid in the marigolds, some grass clippings, topped it with a wheel barrel load of almost finished compost. (Completed or finished compost will not have any recognizable pieces of the original materials. This batch still has some leaf mold and small sticks and chips.)

Then I shoveled the original soil back in place and smoothed it out. I added another half load of compost on top of the soil. Finally, I covered it with pine needles and added wood chips in the walking areas around the bed.

In a few days, I'll turn the next bed.

After burying the marigolds, compost, grass clippings and layering back the original soil, I mulched the whole bed with pine needles. It will sit until fall when it'll be time to start the cool-weather crops. FYI, the downspout shown here, runs into a French drain that runs next to the sidewalk and is released into one of my rain gardens. The rain water then heads down to the lake in an open ravine.

The squash is done, so it was time to turn the marigolds into this bed, too.

I started near the okra (by the bench) and had a load of kitchen scraps ready to compost, so those went into the bottom of this bed for some extra nutrients.

Except for the okra, garlic chives, and the Greek oregano in the foreground, the beds have been turned. The outside bed was turned a couple of weeks ago and so I will probably start planting in that bed first when it's time.

Early in the spring pines also drop their male catkins (sex organs). These break down much more quickly than the pine needles, so if I rake them up, I use them to mulch my blueberries or in the compost pile where their acidity will be neutralized.

For further reading on pine needle mulch:
From Dave's Garden: Pine Needle Acidity: Myth or reality?
On Wildlife Gardeners' website: Pine Straw (Pine Needle) Mulch Acidity: Separating Fact From Fiction Through Analytical Testing

Amazing summer clouds just before sunset last week.

I hope you are enjoying the summer clouds and are planning for your fall garden of edibles. Why not purchase my book to help you get started? Organic Methods for Vegetable Gardening in Florida.

Green Gardening Matters,
Ginny Stibolt